
Polymeric gypsum great for creating the effect of terrazzo: is liquid, fills mould details accurately and produces a smooth, hard surface after curing. Compared to building gypsum, it facilitates colour control and minimises porosity, so that the 'chips' are well embedded and clearly visible after sanding. In this tutorial, we will take you through the entire process: from preparing the coloured chips, to selecting the proportions and pouring the mould, to cut, polish i lacquer.
Working in the e-cupstone ecosystem, you are assured of compatibility: polymeric gypsum + dyes and pigments + silicone moulds + impregnates and varnishes + accessories.
What is the terrazzo effect in polymer plaster?
Terrazzo is casting with "scattered" coloured particles in the mass - usually gypsum chips dyed in various colours. After curing and sanding, the characteristic decorative drawing of dots and specks is obtained. You can use polymer plaster to make trays, coasters, candle holders, decorative tiles or fronts for mini-organisers.
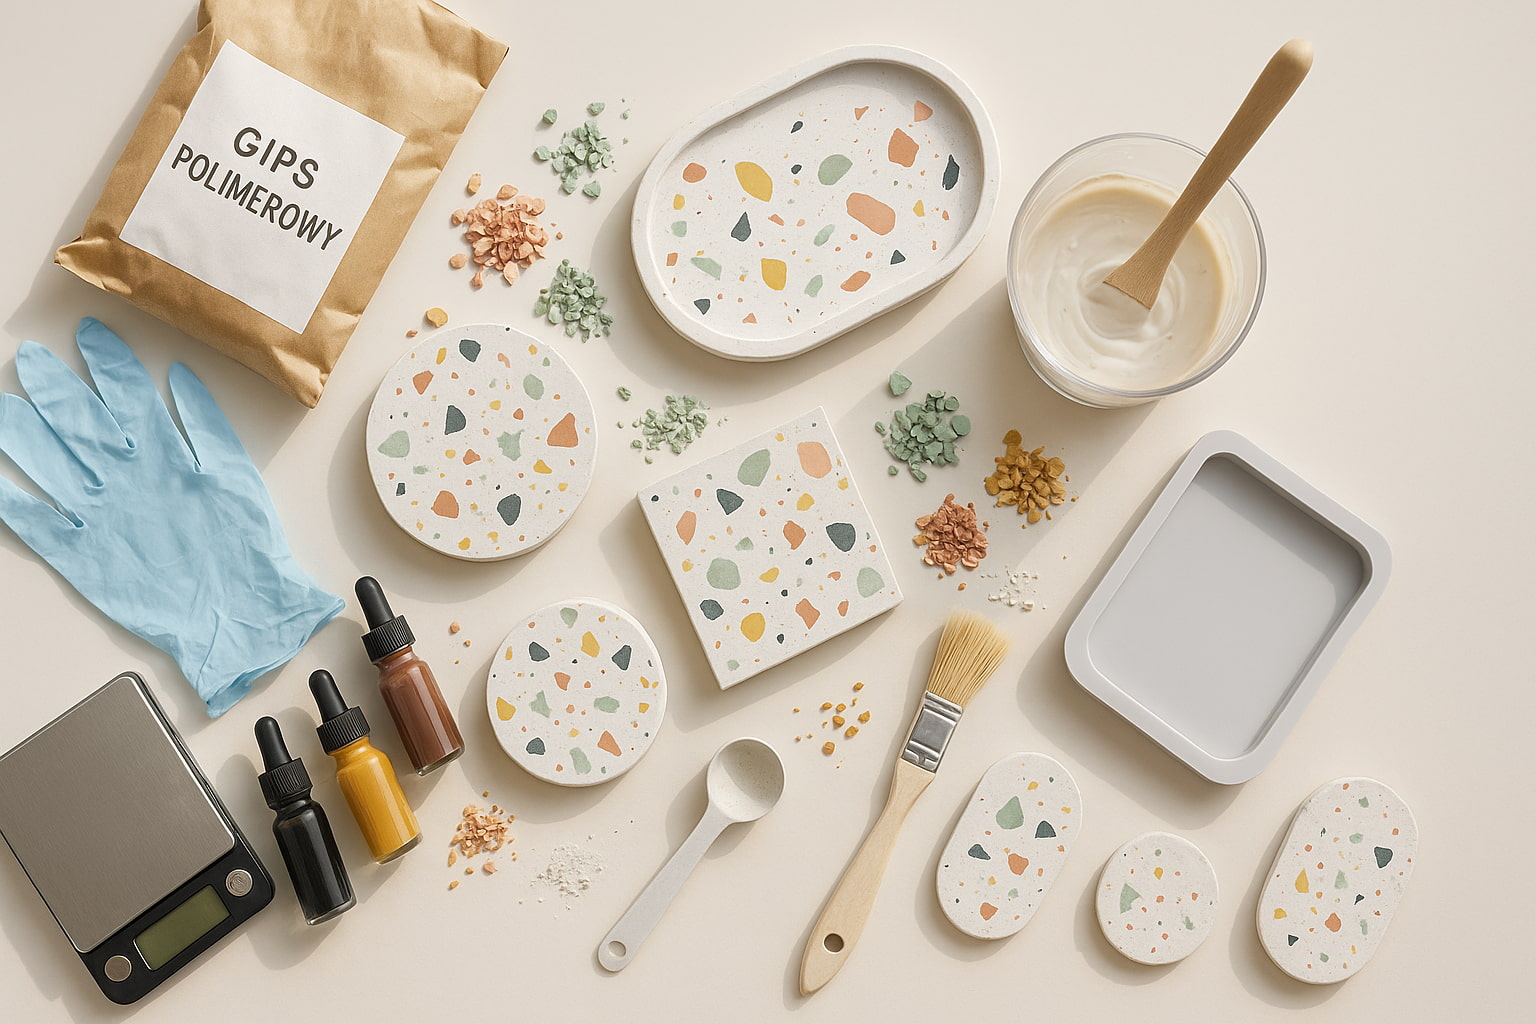
Materials and tools
- Polymeric gypsum e-cupstone (base and 'chips').
- Dyes/pigments for polymer plaster (basic colours + white/black for adjustment).
- Silicone moulds - preferably with a smooth interior (trays, saucers, pots, tiles).
- Impregnates and varnishes - matt/satin/gloss.
- Accessories: weight, containers, slow-speed stirrer, spatulas, brush, sandpaper (P120-P240-P400-P800-P1200), abrasive sponges, towels, gloves and a dust mask.
HEALTH AND SAFETY: working with powder = mask and gloves. Wet sand to reduce dust.
Step 1. Preparation of "chips" (terrazzo fines)
Why plaster chips? They combine best with a base of the same material - identical bonding rates and expansion mean there is less risk of micro-cracking and spalling.
- Make thin test plates
- Mix small portions polymeric gypsum in several colours (dye/pigment to water, then powder).
- Pour a 1-3 mm layer onto a flat tray and Leave until fully cured.
- Mix small portions polymeric gypsum in several colours (dye/pigment to water, then powder).
- Crumbled into chips
- Once dry, place the tiles in a bag and gently crumble with a roller or hammer.
- Fraction size: 2-8 mm. Smaller ones give a subtle pattern, larger ones a bolder pattern.
- Once dry, place the tiles in a bag and gently crumble with a roller or hammer.
- Drying and sieving
- Make sure the chips are dry; sift the dust (dust can 'stain' the base).
- Make sure the chips are dry; sift the dust (dust can 'stain' the base).
Pro tip: Prepare 2-3 shades of the same colour (e.g. 3 tones of green) - the terrazzo will be consistent but vibrant.
Step 2 Base - formulation and consistency
- Proportions: follow product sheet e-cupstone for the selected polymeric gypsum. As a starting point, take the solid, flowing consistency of 'thick cream', which fills the mould freely but will keep the chips suspended.
- Pour gypsum into water a thin trickle, mix slowly, scraping the walls container.
- Venting: after mixing, wait 30-60 s, lightly tap the vessel - will reduce bubbles.
How many crisps? Start with 5-15% base volume (depending on the effect). Always make a small sample - the pattern looks more intense after sanding than 'wet'.
Step 3. Three terrazzo techniques (choose your own)
A) Lastryko "in the mass" (universal, fast)
- Pour the chips into the prepared base and mix briefly, evenly.
- Pour into the mould in a single, steady stream in a one seat - the material will spread itself.
- Gently tap the formto release the air.
- Leave to be bound - do not move the form.
Pros: easy control of pattern density, good repeatability.
Attention: A base that is too thin will 'drown' the chips, one that is too thick will not spread.
B) Decorative layer + construction layer (maximum clear pattern)
- Layer 1 (decorative, 3-5 mm): Rarer base with thicker chips; pour and spread with a brush all over the bottom of the mould.
- Layer 2 (structural): After the initial setting of the first one (when it doesn't stick to the finger), add a regular base without chips to the target thickness.
- Ventilate with a short tap.
Pros: chips are close to the surface - smaller grinding range, stronger drawing.
Attention: make sure that the two layers come together "fresh" (no dust on the joint).
C) "Sprinkle" on wet surface (artistic effect)
- Pour a thin layer of base and immediately sprinkle surface with chips, pressing them gently with a chopstick.
- Add a little base to cover them for 1-2 mm.
- Vent and Leave to be bound.
Pros: full control of colour placement (you can arrange gradients, stripes).
Attention: don't overdo the pressing - local 'islands' can be mechanically weaker.
Step 4 Removal from the mould and seasoning
- Silicone moulds facilitates dismantling and protects edges.
- Defer when casting is stable to the touch (according to the product sheet).
- Allow the element dry before sanding - damp gypsum 'clogs' the paper faster.
Step 5 Sanding and polishing - bringing out the terrazzo
- Wet: start with P120/P180, then P240, P400, P800, P1200 (depending on the desired smoothness).
- Sand evenly, with a flat sponge or block - you will avoid 'waves'.
- After the first pass, you will see the chips 'open up' and become clear.
- Rinse, dry, assess - repeat with finer gradation if necessary.
Tip: you want gloss without a thick layer of varnish? Finish at P1200-P2000 and use a thin impregnation; for the 'glass' choose a gloss varnish.
Step 6: Impregnation and varnishing
- Impregnation protects against stains and enhances the colour of the chips; lacquer (matt/satin/gloss) gives the final touch and makes cleaning easier.
- Apply thinly, evenly, according to product recommendations e-cupstone.
- To candle holders and cup holders, we recommend a water- and dirt-resistant finish (e.g. lacquer).
You will find them in the impregnates and varnishes.
Palette and composition - how to choose colours?
- Monochrome trio: three tones of the same colour (e.g. beiges) + 5-10% black chip for contrast.
- Pastel pop: Light base + pastel chips (mint, peach, lavender) + 2% white chips for brightening.
- Earth and minerals: warm grey + rust + olive.
- Minimal: white base + black and grey chips (various fractions 2-6 mm).
The rule of thumb: 60-30-10 (dominant-secondary-accent colour) gives coherence without chaos.
The most common mistakes and how to avoid them
- Chips "flow" upwards
- Cause: base too thin.
- Solution: thicken the consistency; stir briefly after pouring in the chips.
- Cause: base too thin.
- Uneven distribution of dots
- Cause: stirring for too long, swirling movements.
- Solution: stir only until distributed, pour into the mould in a one seat.
- Cause: stirring for too long, swirling movements.
- Air bubbles at the chips
- Cause: No venting, dry dust chips.
- Solution: Sift the chips, lightly tap the mould, "paint" the bottom with a thin layer of base before pouring.
- Cause: No venting, dry dust chips.
- Colour stains and streaks
- Cause: dye added directly to the thick paste.
- Solution: Dissolve the dye/pigment in the water, only then pour in the powder.
- Cause: dye added directly to the thick paste.
- Brittle edges after deformation
- Cause: too fast removal, damp casting.
- Solution: wait for a stable bond; season before sanding.
- Cause: too fast removal, damp casting.
- Tarnishing after use
- Cause: no protection.
- Solution: relevant impregnate + lacquer suited to the purpose.
- Cause: no protection.
FAQ: polymer gypsum terrazzo
Can I use natural aggregate (pebbles/glass)?
You can, but it is best to combine materials of similar hardness. Chips with polymeric gypsum integrate most cleanly; hard aggregates require longer grinding and care not to make scratches.
How thick should the element be?
For saucers 8-12 mm, for trays 10-18 mm, for pots without water contact - by design. The thicker castingthe longer it dries and the stronger the pattern after sanding.
Can terrazzo be dyed black/white?
Yes - leave the base white and make the chips black (or vice versa). Strong contrast is very striking, but exposes defects - take care with clean forms and even sanding.
Do I need a mould separator?
At silicone moulds usually not, but a thin layer of dedicated agent can make disassembly easier with complex shapes.
Checklist - Terrazzo at a glance
- Plan the palette (3-5 colours) and fraction of chips (2-8 mm).
- Prepare and dry the chips with polymeric gypsum.
- Make a base (dye to water → gypsum for water → free blending).
- Choose a technique: in the mass / decorative layer / sprinkle.
- Pour into the mould, tap, Leave to be bound.
- Deform, dry, Grind wet (P120→P1200).
- Secure impregnate or lacquer (matt/satin/gloss).
Why bet on e-cupstone?
- Consistency and repetition. Our polymeric gypsum is designed for precision casting - fewer pores, cleaner cut, clearer terrazzo.
- Compatible add-ons. Dyes, silicone moulds i impregnates/varnishes form a single, predictable process.
- No compromises. Cheap, untested mixes are more likely to cause stains, shade differences and edge brittleness - costing time and material.
- Support. We will advise on proportions, colours and technique for your project.
Summary
Effect terrazzo z polymeric gypsum is a simple way to decorative and modern character of the castings: trays, saucers, candle holders or tiles gain depth thanks to the colourful chips. The secret lies in three things: well-prepared chips, a stable base and a careful finish (grinding + protection). With e-cupstone products at hand, you will easily arrive at repeatable ones, beautiful results.Ready for your own terrazzo?
Select polymeric gypsum, select the colours in dyes, reach for silicone moulds and finish the work impregnated or varnished. Do you have any questions? Write to us via Contact - we can help you choose the perfect formula and accessories for your project.